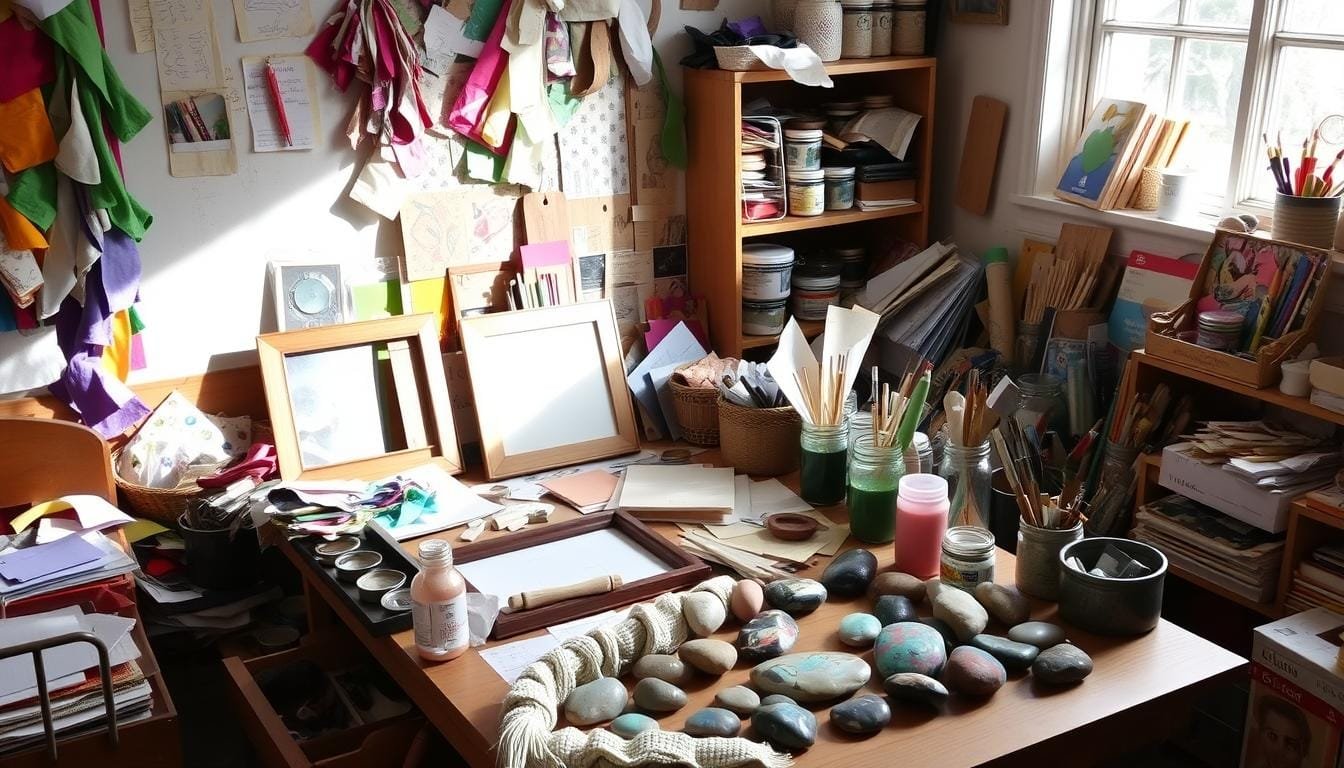
Decluttering Your Crafting Space in 5 Easy Steps
I love crafting, but my space often feels like a mess. It’s full of supplies, tools, and projects I haven’t finished. This mess makes me feel overwhelmed and less creative. Does this sound like you? It’s time to clean up your crafting area.
I decided to make my craft room tidy and productive. I followed a few simple steps and now I feel more in control. I’m excited to help you do the same. Let’s declutter your crafting space in 5 easy steps.
Key Takeaways
- Keeping your craft room clutter-free can reduce stress and improve your creative mindset.
- Regularly decluttering and organizing your supplies can save you time and money.
- Implementing smart storage solutions can help you maintain a well-organized crafting space.
- Donating unused supplies can benefit others and declutter your space.
- Establishing a decluttering schedule can prevent future clutter buildup.
Understanding the Impact of Craft Room Clutter
Clutter in your craft room can really affect your mental health and creativity. A tidy, organized space lets your DIY skills shine. It helps you express your art better.
Mental and Creative Benefits of an Organized Space
A clutter-free craft room helps you think clearer and work better. It makes you feel in control and calm. You’ll find your tools easily, so you can craft more and search less.
How Clutter Affects Your Crafting Productivity
Clutter can really slow you down. It makes finding supplies hard and feels overwhelming. An organized space lets you focus and use your time well.
Signs Your Craft Space Needs Decluttering
- Difficulty finding the supplies you need
- Abandoned or unfinished projects piling up
- Feeling discouraged or uninspired when entering your craft room
- Cluttered surfaces and overflowing storage containers
- Inability to effectively utilize your creative space
Decluttering regularly keeps your space inspiring and organized. It helps you stay focused and creative. A clean craft room lets your talents shine.
Essential Tools and Materials for Decluttering
Starting to declutter your crafting space can seem daunting. But, with the right tools and materials, it becomes easier. By using the marie kondo method and a minimalist crafting approach, you can turn your clutter-free workspace into a creative and productive haven.
First, get a variety of clear plastic storage bins and containers. They let you see what’s inside and save space by stacking. Add labeled bins and trays to keep things organized.
- Use pegboards and wall-mounted shelves to make your space more efficient. They keep things you use often within reach.
- Think about using old furniture or upcycling items to create unique storage. It adds personality to your crafting area.
- Multi-purpose furniture, like ottomans with hidden spots, is great for small spaces. They offer storage and extra seating or workspace.
| Essential Decluttering Tools | Benefits |
|---|---|
| Clear Plastic Bins and Containers | Offer visibility and stackability for efficient space utilization |
| Labeled Sorting Bins and Trays | Keep supplies neatly organized and categorized |
| Pegboards and Wall-Mounted Shelves | Utilize vertical space and keep frequently used items accessible |
| Repurposed or Upcycled Storage Solutions | Add character and charm to your crafting space while saving money |
| Multi-Purpose Furniture | Maximize space in small craft areas with hidden storage and dual functionalities |
With this essential toolkit, you’re ready to make your crafting space clutter-free and minimalist. It will spark joy and inspire your creativity.
Decluttering Your Crafting Space in 5 Easy Steps
Start your journey to a clean workspace with a simple plan. Break down the task into smaller steps. This way, you can turn a messy area into a place that inspires you. Let’s explore the five key steps to declutter your crafting space.
Assessment and Planning Phase
First, take a close look at your crafting area. Identify what needs cleaning up. Note what’s important and what’s not. Plan how long it will take and when you want to finish.
Sorting and Categorizing
Set up a sorting area and sort items into three piles: keep, donate/sell, and throw away. Work on one area at a time. Make quick choices about each item’s value. Use boxes or bins to stay organized.
Decision Making Process
When sorting, ask yourself, “When was the last time I used this?” and “Does it help with my current projects?” Be honest but also consider sentimental value. Keep only what makes you happy and helps your craft.
Decluttering is an ongoing process. Set a regular time to keep your space tidy. This could be monthly, every other month, or quarterly.
“The first step in crafting the life you want is to get rid of everything you don’t.” – Joshua Becker
By following these steps, you’ll make your crafting space better. You’ll work more efficiently and enjoy a space that inspires you. Start the decluttering journey and see how an organized space can change your life.
Smart Storage Solutions for Craft Supplies
Crafting enthusiasts face the challenge of keeping their workspace tidy. But, the right storage can turn your craft room into a productive and creative space. Let’s look at smart ways to organize your supplies.
Vertical Storage Options
Using vertical space is a great way to make the most of your room. Invest in sturdy shelving or pegboards for vertical storage. This saves floor space and makes supplies easy to access. Use clear containers or labeled bins for small items.
Container Organization Systems
A good container system can change your crafting game. Choose clear, labeled boxes for paints, ribbons, and more. This saves time and makes your projects smoother. Use drawer organizers and magnetic boards for tools and small items.
Space-Saving Furniture Choices
Choose furniture that’s both functional and space-saving for your craft room. Folding tables or storage ottomans offer work surfaces and hidden storage. Look for furniture that serves as both a workspace and storage, making the most of your space.
Keeping your craft space organized is all about finding the right system. Try different storage solutions, label your containers, and keep it clean. This way, your creative space will stay inspiring and clutter-free.

“Decluttering and organizing your craft room can be a game-changer, unlocking your creative potential and making your crafting experience more enjoyable.”
Maintaining an Organized Craft Space
Crafting is a fun and rewarding hobby. But, it’s easy for our workspace to get messy. To keep your minimalist crafting area tidy, follow these tips:
- Make decluttering a regular part of your routine. Clean up your organization tips after each session. Also, set aside time each month for a deeper clean.
- Follow the “one in, one out” rule. Before adding new items, think about what you can give away. This helps avoid clutter-free workspace buildup.
- Choose versatile storage options. Use wall shelves or pegboards for vertical space. Consider furniture that has built-in storage, like a craft table with drawers.
- Label and organize your supplies. Keep similar items in labeled containers or boxes. This makes finding what you need easy and keeps your space organized.
- Get your family involved in keeping the space clean. If others use your craft area, teach them to clean up after themselves. This helps with regular decluttering efforts.
By following these habits, you can enjoy a peaceful, clutter-free workspace. It will inspire your creativity and make you more productive. Remember, a little effort keeps your minimalist crafting area organized and efficient.
Keeping your craft space organized requires dedication. But, the benefits are huge. Enjoy the peace of a clutter-free workspace and let your minimalist crafting flourish in a supportive environment.
Maximizing Small Craft Areas
Crafting doesn’t need a big space. With smart storage solutions, DIY organization, and creative space ideas, small areas can become great studios. You can make any small space work well for your crafts.
Multi-functional Furniture Ideas
Choose furniture that does more than one thing. A table that folds up saves space. A cart that rolls around is great for moving things and storing them.
Look for furniture with built-in storage. This keeps your supplies organized and easy to find.
Creative Storage Hacks
- Use the space behind doors with over-the-door organizers or wall-mounted racks.
- Install floating shelves or corner shelves to use vertical space well.
- Turn kitchen organizers, like drawer dividers or spice racks, into craft supply holders.
- Put magnetic strips on walls to hold metal tools and decorations.
- Get portable storage like rolling carts or fabric pouches for easy moving.
These tips help make your craft area organized and useful, even in small spaces. With a bit of creativity and smart DIY organization, your small space can be perfect for crafting.

Organizing Different Types of Craft Supplies
As a crafter, keeping your space organized is key. Whether you sew, paint, or scrapbook, a good system is crucial. It helps keep your supplies in order and your space clutter-free. Let’s look at some ways to organize your craft materials and keep your workspace both functional and inspiring.
Fabric and Yarn Storage
Organizing fabric and yarn can be tough. Here are some tips to help:
- Sort fabric by color or type, and store them in clear bins or on mini bolts for easy visibility.
- Use clear containers or hang yarn using shower curtain rings to keep it tidy and easy to access.
Ribbon and Paper Organization
Ribbons, trims, and paper supplies can quickly get out of hand. Here’s how to keep them organized:
- Utilize binder clips to organize ribbons and trims, keeping them sorted by color or type.
- Store paper in vertical files or accordion folders to maintain a clean and streamlined look.
Beads and Small Embellishments
Small craft supplies like beads and embellishments can be hard to organize. Try these solutions:
- Store beads and small items in tackle boxes or clear pill organizers for easy visibility and access.
- Use pegboards or magnetic boards to neatly display and store frequently used tools and items.
Keeping your crafting space organized is all about finding a system that works for you. Try out different storage solutions and adjust as needed. By using these tips, you’ll create a space that inspires your creativity.
Creating Functional Work Zones
Crafting enthusiasts face the challenge of keeping their space organized. But, with some planning, you can make your craft room a productive and inspiring place. Divide your space into different zones for various tasks.
Workspace Layout Tips
First, choose a main work area for your crafting. This could be a big table or desk with lots of space and comfy chairs. Keep your most used tools and materials close to avoid interruptions.
Then, create a storage zone for your supplies. Use shelves or wall-mounted storage to save space and keep things organized. Labeling containers helps you find what you need quickly.
Lastly, have a display area for your finished projects. This could be a wall, shelves, or a small corner. Displaying your work can inspire you and make you feel proud.
Lighting and Accessibility Considerations
Good lighting is key for a craft space. Make sure your work area is bright with adjustable lights. Also, have dimmable overhead lights for a cozy feel.
Easy access to your supplies is important. Place your most used items at waist level or just above. This makes crafting easier and less tiring.
By setting up different work zones and focusing on lighting and access, you can make a creative space that supports diy organization and keeps your workspace clutter-free. Enjoy the benefits of a well-organized, inspiring craft room.
Sustainable Decluttering Practices
As I start to declutter my crafting space, I think about the planet. Minimalist crafting doesn’t mean giving up on creativity or personal style. It can actually help the environment by reducing waste.
I’ve begun by donating unused craft supplies to schools and community centers. This clears my space and gives old supplies a new home. I also look for ways to recycle items that can’t be donated, to lessen my impact on the environment.
I’ve also started a craft supply swap with other crafters. We exchange items we no longer need, making our supplies last longer. This not only declutters our spaces but also brings us together, sharing our love for crafting and the planet.
Source Links
- https://www.thesimplicityhabit.com/declutter-craft-room/
- https://altenew.com/blogs/paper-crafting-inspiration-and-tips/how-to-declutter-your-craft-room-in-8-easy-steps?srsltid=AfmBOorNGXrC6orsiBulTpamr3Bc_1RYmBZi7quOLfv2G58OGSzrYwJa
- https://www.scrapbook.com/articles/decluttering-and-organizing-your-craft-space?srsltid=AfmBOoqblVPNBW1M8OYf14xaFCfAHRvK8qU9LV3Grv0aq5chXRqeK1rV
- https://www.home-storage-solutions-101.com/declutter-craft-room.html
- https://altenew.com/blogs/paper-crafting-inspiration-and-tips/how-to-declutter-your-craft-room-in-8-easy-steps
- https://www.whitehouseblackshutters.com/decluttering-craft-supplies/
- https://www.scrapbook.com/articles/decluttering-and-organizing-your-craft-space?srsltid=AfmBOootzSgyLB7rMryEFyj1hI_9U34-_RgGqtHO6jXHS7pR_yHpJgGA
- https://altenew.com/blogs/paper-crafting-inspiration-and-tips/how-to-declutter-your-craft-room-in-8-easy-steps?srsltid=AfmBOooQsv0vqcb3TX4S8761igFjlfMIY4q6fLgk9Cv9f7tOx399_baP
- https://declutterinminutes.com/how-to-declutter-a-craft-room/
- https://theturquoisehome.com/arts-crafts-storage-ideas/
- https://www.scrapbook.com/articles/decluttering-and-organizing-your-craft-space?srsltid=AfmBOooVqZzkkCYoaWPM9y5zqKhgsir_tdqWy4WpQBADAxoUtUyaN57e
- https://trusscore.com/blog/craft-room-storage-and-organization-ideas-on-a-budget.html
- https://altenew.com/blogs/paper-crafting-inspiration-and-tips/how-to-declutter-your-craft-room-in-8-easy-steps?srsltid=AfmBOorzDq1rFfoZqyARsLQUdth4DffQNpmuSDspYvR2eCg8-lATHKjr
- https://www.scrapbook.com/articles/decluttering-and-organizing-your-craft-space?srsltid=AfmBOoqaIkmTj4V56ZeJhwEOhEecbtmRdVcwiwwXfqyAi00wOlQyWrYY
- https://getopenspaces.com/blogs/organization-tips/craft-organization-ideas?srsltid=AfmBOoqnnv_hJ6jF-p2G1VyjkumorCCYYNOsrQZ-VJpOXdzDJc8J2zH0
- https://www.scrapbook.com/articles/decluttering-and-organizing-your-craft-space?srsltid=AfmBOorcDZ9grL0k8F-vk0tWqoW-ffn_1KBM_3RJD4xJqs5dB1hBIJfc
- https://altenew.com/blogs/paper-crafting-inspiration-and-tips/10-small-craft-room-ideas-and-tips-to-make-your-space-look-bigger?srsltid=AfmBOooQCZzpv0sSj060OOrGaRb2PIBJRFmims_S9nbu7WnLcHoZG88U
- https://www.happysimplemom.com/craft-room-organization/
- https://www.planandorganize.com/at-home/organize-your-craft-supplies/
- https://nourishingminimalism.com/declutter-organize-craft-room/
- https://www.scrapbook.com/articles/decluttering-and-organizing-your-craft-space?srsltid=AfmBOorB5dCnUhtpnIAdmauRDmCmCzZ3ehClguxr5bTL0SYzIuiPs7hU
- https://psorganizing.com/2024/09/organizing-your-craft-room/
- https://getopenspaces.com/blogs/organization-tips/craft-organization-ideas?srsltid=AfmBOorDSpgd02sH1KSAh4Alw4bnS52pIZC4W_Ddjx9kR3_EFz2E26mO
- https://suzettegebhardt.com/easy-decluttering-process/
- https://mindfulofthehome.com/sustainable-decluttering-tips/
- https://www.blesserhouse.com/how-to-declutter-your-home-quickly-with-these-organizer-secrets/
Jen is a healthcare pro by day and a DIY enthusiast by night, bringing creativity to life on JF Craft Corner! From decoupage to Cricut crafts, she’s all about making DIY magic (and a little mess). She also co-runs The Heart of Mindful Living blog and podcast, inspiring others to refresh their minds and nurture their souls. Her trusty sidekick? Fergus, her chocolate Shih Tzu and certified therapy dog, always on cuddle duty. Jen believes true leadership starts with kindness—and, of course, a little glitter!