From Rusty to Rustic: Give Your Old Toolbox a Glow-Up They Never Saw Coming!

Ever look at that crusty old toolbox in your garage and think, “You’ve got potential, buddy”? Well, grab your paint brushes and let’s turn that tired toolbox into a piece so pretty, your garden tools or crafting supplies will feel like they’re vacationing at a spa!
Today, I’m sharing one of my favorite upcycling projects that’s guaranteed to transform your space and give new life to old treasures. Trust me, after this makeover, you’ll be hunting through flea markets for more toolboxes to rescue!
What You’ll Need
Before we dive into this transformation, let’s gather our supplies (or as I like to call it, our toolbox transformation toolkit):
- Rust-Oleum black spray paint (because every makeover needs a good base, just like my morning coffee!)
- Fusion Mineral Paint in your choice of “make it pretty” colors
- IOD transfers (think temporary tattoos, but for your toolbox)
- 220-grit sandpaper
- Clear matte sealer
- Basic painting supplies
- Decoupage paper of your choice (optional)
- Decoupage medium (optional)
Quick confession: My first attempt at this project looked like my toolbox got into a fight with a craft store and lost. But stick with me – I’ve learned all the tricks so you don’t have to!
Step-by-Step Transformation
1. Prep & Paint Party
Start by cleaning your toolbox. Don’t worry if it looks like it’s been through two world wars – we’re going for “charming vintage,” not “museum piece.” Give it a good coat of black spray paint, inside and out. Think of it as your toolbox’s little black dress – it’s all about that base!
Once dry, apply your Fusion Mineral Paint. I chose a creamy neutral because my toolbox was feeling fancy. Two coats should do it, but remember – perfection is boring! Those little imperfections? We call those “character lines” in the DIY world.
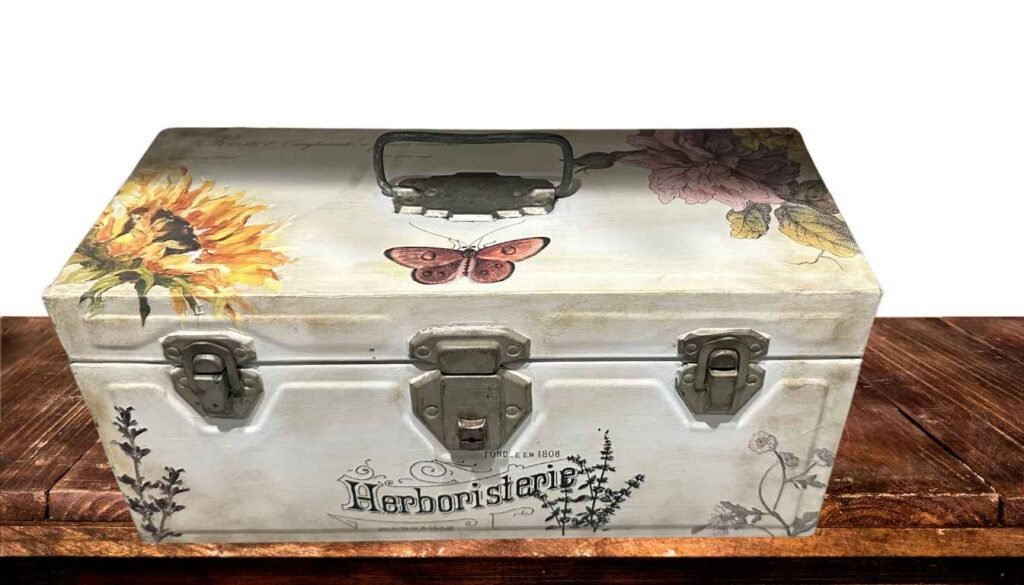
2. The Fun Part: Adding Transfers
Now grab those IOD transfers – these beauties are about to take your toolbox from “what’s that in the corner?” to “where did you buy that?!” Cut out your designs and position them like you’re planning a tiny art gallery.
Pro Tip: If you mess up placing a transfer, just pretend it was intentional. I’ve started at least three “new trends” this way.

3. Final Touches
You can decoupage the sides of the tool box to give it an added touch of whimsy. Or light distressing with sandpaper gives it that “I’ve been cherished for generations” look (rather than “I found this behind the lawnmower last Tuesday”). Seal it all with two coats of clear sealer, and voilà!

Ways to Use Your Transformed Toolbox
Your gorgeous “new” toolbox can serve so many purposes:
- Organize garden supplies (so fancy even your trowel will feel posh)
- Store craft materials (because nothing says “I’m a serious crafter” like a gorgeous toolbox)
- Create centerpieces that’ll make your mother-in-law ask where you bought it
- Display vintage books or collectibles
Ready to Try It Yourself?
This project is truly one of my favorites because it’s so versatile and forgiving. Each piece turns out uniquely beautiful, and there’s something so satisfying about giving new life to old treasures.
Tag @JFCraftCorner in your toolbox transformation photos – I promise to ooh and aah appropriately! And remember, if your first attempt doesn’t look exactly like mine, that just means you’ve created a one-of-a-kind piece. That’s my story, and I’m sticking to it!
Want more crafty adventures delivered to your inbox? Subscribe below for weekly inspiration and the occasional craft fail story that’ll make you feel better about your own projects!
Shop the Supplies
Looking for the perfect supplies to start your project? Check out our Shop Our Faves page – where all your crafting dreams come true (and your wallet slightly weeps).
Share Your Story!
Drop a comment below and tell me: what’s the most random thing you’ve ever upcycled? I once transformed a cheese grater into a candle holder… but that’s a story for another post!
Jen is a healthcare pro by day and a DIY enthusiast by night, bringing creativity to life on JF Craft Corner! From decoupage to Cricut crafts, she’s all about making DIY magic (and a little mess). She also co-runs The Heart of Mindful Living blog and podcast, inspiring others to refresh their minds and nurture their souls. Her trusty sidekick? Fergus, her chocolate Shih Tzu and certified therapy dog, always on cuddle duty. Jen believes true leadership starts with kindness—and, of course, a little glitter!